I wrote this guide after playing through the early hours of the game and testing what works best if you want a smooth start without unnecessary frustration. Black Souls 2 can feel overwhelming when you first jump in, especially if you don’t know where to go or what to grab early.
This route keeps things simple and lets you build solid momentum fast without skipping anything important or breaking the experience.
There might be some minor differences if you are coming straight from the Steam version compared to older builds, but every core step here still works the same.
When I mention choices, the numbering refers to the dialogue options from top to bottom.
Intro Info – Picking Your Character
Your starting character choice only affects the very beginning. Later on, the differences become so small that you can treat it as cosmetic, especially since you can change your appearance later anyway.
Since the goal here is to have the easiest early experience while earning a good amount of souls, two classes stand out:
Thief
Starts with solid gear, higher movement speed, and already has 1000 Souls at the beginning.
Explorer
Combat stats are weaker, but you begin with a big pile of consumables that can be sold for early money. This guide itself was tested using Explorer, but everything here works with any class.
Alice’s backstory choice does not matter, so pick whatever you like.
Part 1 – Setting Up Your Economy
Once you spawn in, head up the stairs into the rabbit room. Loot everything, search all bodies, then go left. The Cheshire Cat appears here.
Talk to the cat, walk forward, talk again, and accept the Master Key.
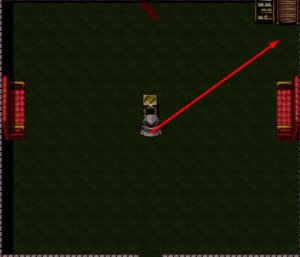
After that, return to the door and drop off the edge. This lands you inside the Dream Library hub. This area becomes extremely important.
On the right side is a red book on a shelf. Interact with it five times and you’ll receive two Rings of Greed.
Equip both of them immediately. These double all souls and item drops, which completely changes how profitable the entire early game becomes.
To the left of the room sits the bear merchant. Talk to him, open his shop, then exit the dialogue. He gifts you 500 Souls for free.
Now head down the stairs into the dungeon and explore all three floors. Loot literally everything you can find.
Return to the bear and buy:
- 1 Fire Bomb
- 8 Throwing Knives
These items are used directly for the first major boss.
Go back to the Crumbling Chamber and resume looting. Once that area is clear, head to the passage on the right.
There will be a patrolling knight here. He does not bother you. Let him turn around, follow behind him, and go into the door.
The Size Puzzle Area
Inside is a small room with a potion titled Drink Me placed centrally.
Drink it, then pick up the item called Eat Me.
In the upper-right corner you’ll find the Rabbit Key.
Use the second item to return to normal size.
Important: do NOT enter the upper-center passage.
Wait until the patrolling enemy finishes its route and pauses. When a gap forms, use the same path you entered to move out safely.
First Boss Fight – Safe Method
Whether you run or die getting through doesn’t matter. Once back upstairs, you’ll start the boss fight.
Before entering:
- Use up to three Black Souls to boost yourself.
- Heal fully.
- Make sure both Rings of Greed are equipped.
During the fight, the boss repeatedly applies a self-buff.
Whenever that animation begins, cast Interruption.
This:
- Locks the boss into vulnerability.
- Causes the boss to take heavily increased damage.
- Prevents attacks for multiple turns.
While interrupted, unload:
- All your Throwing Knives
- Your Fire Bomb
One interruption cycle will not kill him outright. After the first phase, he may attempt to attack or reapply buff. When he prepares to attack, simply use Dodge.
Repeat the interruption process until he goes down.
Do not bother searching the boss room afterward, there’s nothing useful there.
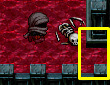
Proceed through the exit door, loot every guard corpse, avoid the red monster, and light the next bonfire.
Part 2 – Soul Investment & Covenant Setup
Return to the hub and go talk to Nod.
Next, walk to the red chest on the right and trade the Beast Soul for a sword. This becomes your main early weapon upgrade.
Return to the bear merchant and sell almost everything, keeping only:
- Blood Bottles
- Ore Shards
- Invisible Pepper
Buy the Master Key from him if you didn’t earlier.
Now go back to Nod and form the covenant with him.
Use your Souls to reach a total investment of about 10,000 Souls worth of leveling.
Going Small
Return to the shrinking potion room, drink the potion again, and enter the upper central passage this time.
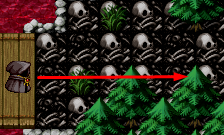
You arrive at the Sea of Bloody Tears.
Light the bonfire here.
Use your Invisible Pepper while exploring the upper paths so enemies don’t interrupt looting.
On the right side of the wall is a narrow hidden gap. Walk into it and you’ll be transported to a small side-room where a chest contains a Spell Book. Immediately use it.
Return outside.
Head down toward the waterfall, drop off, and gather everything in the lower area.
Speak to Dodo:
Choose:
[1] I am searching for Alice
[2] Please, tell me
Talk to her again but leave dialogue without selecting anything.
To the right is the exit leading into Liddell Graveyard.
Loot the bonfire area, speak to the Pumpkin NPC, light the bonfire, and return to Dodo.
Now speak to her again and create her covenant.
Level the covenant to maximum.
After the first covenant rank, she teaches you the most important early game ability: Fast Run.
Open:
Menu → Skills → Activate “Run Like Dodo”
From this moment your basic movement becomes much faster both in exploration and combat.
Return again to the hub, sell off spare items, and spend additional Souls on leveling, keeping a few thousand in reserve.
Part 3 – Gear Farming Route
Head to Lutwidge.
Just below the bonfire is a section of wall hiding five candies. Collect and sell them.
Move to the crossroads and go right.
Stick to the lower edge of the path to avoid the kidnapper enemy until you reach carriagess and find a chest holding another Spell Book.
Continue all the way down into the sewers.
Follow the left wall and enter the third door, where you find more gear.
Return back to the bonfire and descend into the sewers again.
Drop down the ladder and follow left until the third corridor once more.
Here you collect both weapon gear and armor.
Enemies will drop from the ceiling, but you can safely bait them out one at a time before progressing.
At the far end you’ll discover the body of the Demon Hunter, whose corpse provides the full remainder of his equipment set.
Grab absolutely everything and carefully return.
At this point your character will be sitting extremely comfortably for early progression:
- Proper weapon upgrade
- Full gear set
- Multiple spellbooks and utility abilities
- Rings of Greed doubling gains
- Maximum covenant buffs from Nod and Dodo
- Fast Run unlocked
- Large Soul stockpile for leveling
You haven’t skipped content, you haven’t broken progression curve, and you didn’t use any exploit routes. Everything here fits naturally into the intended early-game flow.
Going further than this to ease progression would start spoiling discovery and the overall experience. This route already removes most unnecessary pain while keeping the game’s core challenge intact.
After following this route, you are fully set to explore the rest of Black Souls 2 at your own pace with a strong foundation. You’ll have survivability, mobility, damage, and enough Souls to prevent early stat bottlenecks.
From here onward, it becomes a true free-roam progression journey with plenty of flexibility depending on your playstyle.
Enjoy the descent into Black Souls 2.